Showing posts with label Windows 7. Show all posts

Wednesday, 29 May 2013

How To Create a Windows 7 Password Reset Disk?

Hi Everyone,

If you have tendancy to forget your windows password. Better create a Winows 7 Password Recovery Disk. With it, you can easily reset your Windows 7 password and forgetting your password is no longer a nightmare.


Here is how we create Windows 7 Password Reset Disk.

1. Click on Start and then Control Panel in Windows 7.

2. If you are seeing Category View, Click on the User Accounts and Family Safety link and then click on the User Accounts link.

Note: If you are seeing Large/Small Icons view, click on the User Accounts icon and proceed.
Click on the User Accounts link.

3. You need a USB Flash Drive or Floppy disk to create the Password Reset Disk. You will not be able to create a Windows 7 password reset disk on a CD, DVD, or external hard drive.

4. In the task pane on the left, click the Create a password reset disk link.

5. When the Forgotten Password Wizard window appears, insert a USB Flash Drive and click Next.


6. In the I want to create a password key disk in the following drive: drop down box, choose the portable media drive to create a Windows 7 password reset disk on.

7. Click Next to continue.


8. With the disk or other media still in the drive, enter your current account password in the text box and click Next.

9. Windows 7 will now create the password reset disk on your chosen media.

10. When the progress indicator shows 100% complete, click Next and then click Finish in the next window.

11. You can now remove the flash drive from your computer.

Please keep it in a safe place since anyone with this disk can reset your password.

Thanks for reading my blog !

How To Change Drive Letters in Windows 7?

Hi Everyone,

If you want to change the drive letter of your choice of the hard drive partition in your computer. I have solution here. Note that you cannot change the drive letter of the partition that Windows 7 is installed on. In a normal Windows 7 system, this is the C drive.


Here are those simple steps to change a drive letter in Windows 7:

1. Open Run window by pressing Win+R key.

2. Type diskmgmt.msc and hit enter to open Windows 7 Disk Management.

Note: You can also open Disk Management from the Computer Management utility.

3. On the right-hand side of the screen, locate and right-click on the drive that you wish to change the drive letter of and choose Change Drive Letter and Paths option.
4. In the Change Drive Letter and Paths window, click on the Change button.

5. The Change Drive Letter or Path dialog box will appear.

6. Choose the drive letter you wish to assign to this drive by clicking the letter from the drop-down box on the right.


7. Click OK.

8. The Disk Management window that appears advises you that "Some programs that rely on drive letters might not run correctly. Do you want to continue?".

Note: If you have software installed to this drive, the software may stop functioning after a drive letter change. Nearly all software defaults to the primary drive though, so this is rarely a concern.

9. Click Yes, If you are sure you want to make this change.

10. We are done and Now you can now close the Disk Management window.

Thanks for reading my blog !

Tuesday, 21 May 2013

Windows 7 - How To Create a Windows 7 System Repair Disc ?


Hi Everyone,

A Windows 7 System Repair Disc enables you access to Windows 7's System Recovery Options. It is a powerful set of Microsoft in-built diagnostic and repair utilities.


It is highly advisable to create a System Repair Disc. With a System Repair Disc, you can access Windows 7 diagnostic tools like Startup Repair, System Restore, System Image Recovery, Windows Memory Diagnostic, and Command Prompt. System repair Disc should be stored in a Optical Disc rather USB Flash drive.


Here are the steps to create a Windows 7 System Repair Disc:

1. Open Run window by pressing Win+R key.

2. Type recdisc and hit enter.

Note: This can be accessed also from the start menu. Start -> All Programs -> Maintenance -> Create a System Repair Disc

3. Choose your optical disc drive from the Drive: drop-down box.

4. Insert a blank disc in your optical drive. Make sure the blank CD/DVD shoould have enough space. The size of System repair Disc will be less than 200 MB.

5. Click the Create disc button. Now Windows 7 will create the System Repair Disc. No special disc burning software is required.

6. Once the System Repair Disc creation is complete, Windows 7 displays a dialog box that you can close by clicking the Close button.

7. Click the OK button on the original Create a system repair disc window.

Now our System Recovery Disc is ready to be used.

Thanks for reading my blog !

Monday, 20 May 2013

Windows - Install Windows Operating System from USB Drive

Hi Everybody,

I am here to explain you how to install an operating system if you don't have a DVD Drive in your computer. Most of the computers shipped with USB ports and USB boot option available in the BIOS. Before we start with this make sure you set the following configurations.
  • Enable USB boot in the BIOS
  • Change the Boot priority to boot from the other devices (NOT DVD Drive / Hard Drive).


Please see the Mother Board / BIOS Manual if you have any doubts in setting the above configurations.


This is all about the hardware settings, now we will discuss the windows part of it.

diskpart command is used to make a USB Drive a bootable OS package.

 Follow the below simple steps to get this done.

1. Open Run window by pressing Win+R key.

2. Type cmd and hit enter.

3. Now we have the Command Prompt, type diskpart and hit enter.


4. List the disk drives connected to the computer.
list disk
5. Select the Connected USB disk from the list (If you have doubt on disk selection, cross check the size of disk and size shown in the list).
select disk 1
Note: This site will not be responsible for any data loss due to wrong selection of disk.

If you want to see the details about the disk use the below command.
detail disk
6. Removes existing partition or volume formatting from the disk with the below command.
clean
7. Create a primary partition in the current select disk.
create partition primary
8. Select the created partition.
select partition 1
9. Make the selected partition active.
active
10. Format the partition with the appropriate file system. For windows, FAT32 file system.
format fs=fat32
11. Assign the drive letter to the new partition.
assign
Now our USB drive is ready to copy the Operating System disk content.

12. Exit from the diskpart
exit
13. Copy the OS Installation Disk content to the USB Drive. We use XCOPY command to copy the contents.
xcopy K:\*.* /s/e/f L:\
Here K:\ is the root folder with the OS Installation files and L:\ is the USB Drive.

14. Plug the USB Drive, Boot from it and complete the installation.

Thanks for reading my Blog !


Wednesday, 15 May 2013

Windows 7 - How to use problem steps recorder?


Hi Everyone,

Windows 7 is shipped with a tool named Problem Steps Recorder. Unfortunately it is not listed in the Start Menu. Most of the users are not aware of this tool. This helps to record the activities step-by-step with screen shots and descriptions in an MHTML Document. With some simple steps, I will explain you on how to use the tool.


1. Open Run window by pressing Win+R key.
2. Type "psr" and hit enter.


3. Now start recording by hitting the Red Button with label  "Start Record"


4. Perform the activities and stop recording by hitting "Stop Record" button.
5. It will pops out  Save dialogue box, save the file as Zip file.
6.Unzip the file, open it and see the magic.

Thanks for reading my Blog !

Saturday, 11 May 2013

Windows 7 - How to get a power efficiency report?


Hi Everyone,
Here is an interesting feature of Windows 7 to improve the power consumption of your laptops.

If you have a laptop, you can use the efficiency calculator to get Windows 7 to generate loads of useful information about its power consumption.This may help you gain battery life and performance for your laptop. Follow some simple steps to achieve this. (All the command mentioned in the below steps should be typed without quotes)
1. Open a command prompt as an administrator by typing ‘cmd’ in Start Search, and when the cmd icon appears, right-click it and choose "Run as administrator".
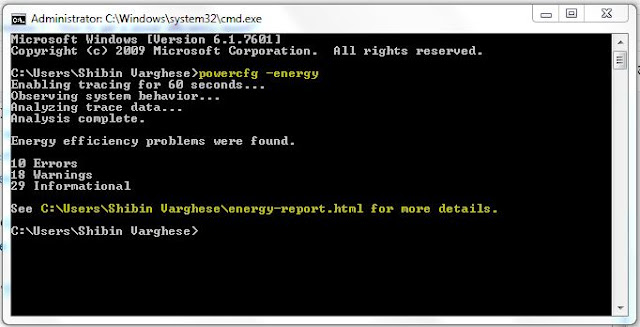
2. Then at the command line, just type in ‘powercfg -energy’ and hit Enter button.
Windows 7 will scan your system looking for ways to improve power efficiency. It will then publish the results in an HTML file. The report file path will be displayed in the screen once system finishes scanning.


Thanks for reading my Blog !


Windows 7 - How to enable God Mode ?

Hi Everyone,

God is the one who can give us everything that we wish, that is what most us think. And here I will help you out with an option in Windows 7 that serves you with almost all option in the operating system. We can achieve it by following some steps below.


1. Create a New Folder anywhere in your computer.

2. Rename it to GodMode.{ED7BA470-8E54-465E-825C-99712043E01C}now the folder’s icon will change to resemble a control panel

3.Open the Icon and feel the God in Windows 7.


Thanks for reading my Blog !

Wednesday, 8 May 2013

Disabling User Log-in Screen in Windows 7

Hi Everyone,

Here are the steps to disable the Log-in Screen when you don't have password protected user account.


1. Press the Windows key + R on your keyboard to launch the “Run” dialog box.

2. Type in control userpasswords2


3. Press Enter. The User Accounts window will display.

4. Uncheck the option “Users must enter a user name and password to use this computer”


After the above steps you may need to restart your machine to apply the changes.


Thanks for reading my blog and happy logging-in without log-in screen !