Friday 20 March 2015

Part 5: Data Warehouse Dimensional Modelling

In this series, the previous post was about Part 4: Types of Data Warehouses. Please go through if you missed it.

What is Dimensional Modelling?

The techniques, concepts and methodologies used in designing Data Warehouse is called Dimensional Modelling. The Data Models are designed in discussion with Subject Matter Experts and Data Governance Representatives of the Business. The Data Modeler is responsible for building the Data Model after series of workshops with the Business representatives. Dimensional Models should not be designed in isolation by the personnel with out business knowledge.  

Dimensional Modelling Process

There are 4 steps involved in the Dimensional Modelling.

Identify the Business Process

This step involves identifying the business process for which the data warehouse is to be built. For example, Sales module of Department Store, Claim module of an Insurance Company, Credit Card module of a Bank, etc.
Once the module is identified. The reporting needs for the modules is determined with the help of data analysts and Business Representatives and they will determine the Grain, Dimensions and Facts for the Business Process Reporting. 


Declare the Grain

The grain is the smallest unit of data in the business modules. For example, Debit or Credit transaction in a Bank, Insurance Premium transaction, Line Item transaction in a Departmental Store, etc.

Identify the Dimensions

The dimensions defines multiples contexts of the business and it tries to answers who, what, when, where, how, why, etc. Product, Location, Store, Sales Man, Time, etc are the examples of dimension in a Department Store. Dimension Table holds the text or descriptive values. The dimension gives the meaning to the reports. More effort is put into the governance and the development of the dimension tables because they are the drivers of the users BI experience.

Sample Dimension Table:

Identify the Facts

The facts are the measurable values that is generated as an outcome of the business process. The quantity of an item, Amount of a Product, Discount for a Product, Margin from a Product, etc are the examples of facts. Facts are mostly numeric values. These facts can be stored in one or more tables based on the grain. The discount and Sale Amount can be stored in the same Fact Table. But Sales Amount of a Bill and Sales Amount of a product cannot be stored in the same table since these are of different grain.

Sample Fact Table:


We will see Types of Schema, Dimensions, Facts in detail in the upcoming posts.

Thanks for reading this blog.

Monday 16 March 2015

Rooting Huawei Honor 6 H60-L04 (Indian Version).

Hi Everyone,

Today I am going to give steps on How to root Huawei Honor H60-L04 (Indian Version)?. This will enable the Root Access and will not upgrade your Android Version. I have successfully rooted my Huawei Honor 6 with the below steps. All the credits for the process goes to the thread posted in Huawei Honor Club Forum.

Warning: Before we start with the process, I would like to inform you that I or this site will not responsible for any data loss, if you make any mistakes and Bricked Device. Rooting the phone will void the warranty.

I have divided the process into below 5 activities.

A. Getting Unlock Password
B. Downloads
C. Preparing the Phone
D. Unlock Boot Loader
E. Installing CWM Recovery
F. Backing Up and Flashing SuperSU.

Okay ! lets begin the process.

A. Getting Unlock Password

1. Apply for the unlocking password for your device on EmotionUI - Unlock Bootloader (Use Chrome Browser)
2. Select HUAWEI C8812 (or whichever we can change this)
3. Right click the selection and choose Inspect Element

4. Double click HUAWEI C8812 and Type H60-L04 and hit Enter. Your Product Model should get changed.


5. Enter Product Serial. Settings - About Phone - Status

6. Enter Product IMEI - *#06#
7. Enter Product ID - *#*#1357946#*#*
8. Enter Verification Code and Submit
9. Your will get the 16 digit unlocking password - Note it down safely.

B. Downloads

1. Download and Install HiSuite (This is important so that your PC gets the required drivers installed)
2. Download Honor 6 Multi Tool
3. Extract Honor 6 Multi Tool.zip and get the SuperSU.zip (Do not unzip SuperSU.zip) from the tools folder and put it on your phones internal memory card.

C. Preparing the Phone

1. Enable Developer Mode on your phone. (Go to Setting - About Phone - Tap Build Number 7 times). Then go to Settings - Developer Options - Enable USB Debugging.


D. Unlock Boot Loader

1. Power Off your phone and press Volume Down and connect USB to computer (while pressing down Volume Down) to enter Fast Boot mode. You can see the message "Phone Locked" or "Locked"

2. Run HONOR 6 Multi-Tool v2.00.bat on your computer

3. Type 1 to select Bootloader, Type 2 to select Unlock Bootloader.


4. Enter your 16 Digit Unlock code and press enter. Your phone is now unlocked.

E. Installing CWM Recovery

1. Start your phone in Fast Boot mode. You can see the message "PHONE Unlocked" and this is the indication that the Bootloader is unlocked.

2. Open Multi-Tool and select Option 2 for Recovery and then Option 1 to install CWM. (You need to be connected to internet and this will take a few minutes)

After the CWM installation, you will get the screen as below.

F. Backing Up and Flashing SuperSU.

1. Boot your phone in CWM Recovery by pressing Volume Up+Power and save a backup of your phone system and data. (This takes some time depending on the data)
2. Boot your phone in Fast Boot mode (Note: If your phone is stuck in Fast Boot mode at any time press Volume UP+Volume Down+Power all at once to reboot the phone.)
3. Open Multi-Tool and select option 3 - Root and select Option 1 - I have CWM Installed.

4. Boot your phone in CWM reovery (Volume UP+Power) go to Install Zip from SD Card and choose SuperSU.zip which was copied to your phone internal SD card and install it.

5. The phone may ask "Root may be list! Restore Now?" Select NO
6. Restart the phone from CWM recovery and you should have SuperSU on your phone.

Congratulations! Your phone is now rooted. 

Sunday 8 February 2015

Part 4: Types of Data Warehouses

In this series, the previous post was about Part 3: Types of Data Warehouse Architectures. Please go through it, if you missed it.

A data warehouse is a relational/multidimensional database that is designed for query and analysis rather than transaction processing. A data warehouse usually contains historical data that is derived from transaction data. It separates analysis workload from transaction workload and enables a business to consolidate data from several sources.
In addition to a relational/multidimensional database; a data warehouse environment often consists of an ETL solution, an OLAP engine, client analysis tools, and other applications that manage the process of gathering data and delivering it to business users.

There are three types of data warehouses:

  • Enterprise Data Warehouse
  • ODS (Operational Data Store)
  • Data Mart


Enterprise Data Warehouse

In an enterprise Data Warehouse, the entire data of the organisation is fetched from the heterogeneous data sources into the ODS, then the data is loaded in to the data warehouse after cleansing and applying business transformations. 
The data marts are built from the data warehouse. Each data mart will hold the data specific to the departments in the organization. Each user group will have access to the respective data marts. This mechanism helps to secure the data by avoiding unnecessary access and it also speed up the report generation.The user groups uses analytic tools to generate the reports from the respective data marts.

ODS (Operational Data Store)

ODS is the place where the data from multiple heterogeneous sources are stored for further processing. Data is loaded to the ODS in batches. Data once loaded in the ODS will not go back to the OLTP / Source / Originating system. Some amount of cleansing and standardization is applied to the data before storing it in the Operational Data Store. It act as a single version of truth to the organization. It enables the user to get all the organizational information at one place. ODS is not a data warehouse. But it act as an intermediate storage in the data warehouse. In the above diagram, the data from files, CRM, ERP, Web Service, etc are loaded into the ODS using ETL process.


Data Mart

Data Mart is a subset of Data Warehouse. There are 2 different approaches in Data Warehouse.

Top-Down Approach

Top-Down Approach is introduced by Bill Inmon. In this approach, the data warehouse is created first. Then the data marts are created from the broad data warehouse. For example Sales, Purchase, Marketing, Human Resource, etc.

Advantages

  • The entire organizational data will be available to uses from the data warehouse.

Disadvantages

  • Development time is more.
  • Scalability is complex.

Bottom-Up Approach

Bottom-Up Approach is introduced by Ralph Kimball. In this approach, the data marts are created first. Each data mart serves a particular business area's reporting requirements in an organization. For example Sales, Purchase, Marketing, Human Resource, etc.
Once the data marts are created, all these data marts are integrated together to form the data warehouse.

Advantages
  • Development time is minimal since it will not create the entire data warehouse at once.
  • Faster report availability.
  • Highly scalable.

Disadvantages
  • The entire information of the organization will not be available since the data is scattered in different data marts.

Thanks for reading my blog.

Thursday 15 January 2015

Part 3: Types of Data Warehouse Architectures

Data Warehouse Architectures

In this series, the previous post was about Part 2: Data Warehousing Concepts - OLTP Vs Data Warehouse. Please go through it if you did not read.

Below are some of the widely used Data Warehouse architectures.

  • Basic Data Warehouse Architecture
  • Data Warehouse Architecture with Staging Area
  • Data Warehouse Architecture with Staging Area and Data Marts

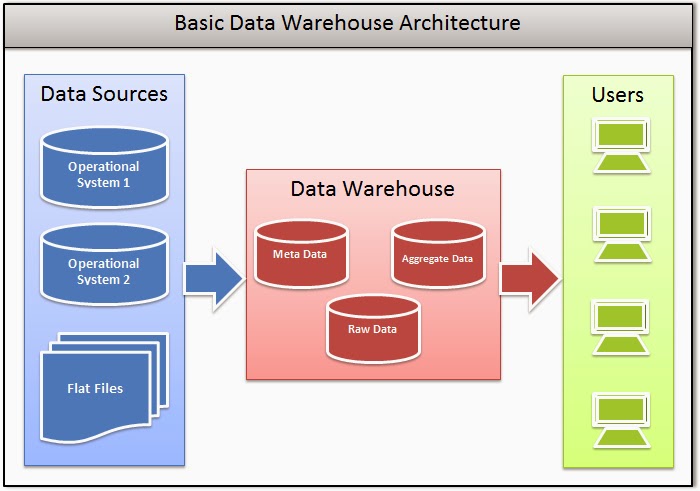
Basic Data Warehouse Architecture

In the Basic Data Warehouse, the data from the transaction system (OLTP) is loaded in to the Data Warehouse and finally it reaches the end users.
http://www.amazon.in/b?node=1592905031&ref_=as_acmain_dotd&tag=techvolc0d-21
Advantages
  • Development effort is comparatively less.
  • By the use enterprise Data Warehouse, provide single version truth for analysis.
Disadvantages
  • Depends on OLTP system.
  • OLTP down times affects the Data Warehouse load.
  • Data Warehouse load may slow down the OLTP performance.
  • Data needs to be loaded before the next OLTP up time.

Data Warehouse Architecture with Staging Area

In the Data Warehouse with Staging Area, the data from the OLTP System is loaded in to a Staging Area first. The loaded in the Staging Area is cleansed to some extent and the cleansed data is loaded to the Data Warehouse. The frequency of load will be daily, weekly, monthly, etc based on the business requirement.

Advantages

  • Less dependent on OLTP System since the data is staged.
  • OLTP Down times will not affect the Data Warehouse load.
  • Will get enough time to complete the Data Warehouse load.
  • Data Warehouse load will not affect the OLTP performance.

Disadvantages

  • Development time is more.

Data Warehouse Architecture with Staging Area and Data Marts

In the Data Warehouse with Staging Area and Data Mart, architecture is same as the previous architecture. The only difference here is the Data  Marts. A data mart is a subset of data warehouse that is designed for a particular line of business; such as sales, Purchase, Stock, etc. Each data mart is built from the Enterprise Data Warehouse. Only some group of users will have access to the specific Data Marts. For example, Only Analysts from Sales department will have access to the Sales Data Mart.

Advantages

  • Less dependent on OLTP System since the data is staged.
  • OLTP Down times will not affect the Data Warehouse load.
  • Will get enough time to complete the Data Warehouse load.
  • Data Warehouse load will not affect the OLTP performance.
  • User specific Data Marts will speed up the performance for each department.

Disadvantages

  • Development effort is more.
  • Not all department will have access to the entire data or Enterprise Data Warehouse.
In my next post, I will explain about the types of Data Warehouses.

If my post helped you understand the concept. Please like and share with your friends and also share your comments with me to make the content better. Thanks for visiting my Blog.

Saturday 10 January 2015

Part 2: Data Warehousing Concepts - OLTP Vs Data Warehouse

OLTP Vs Data Warehouse

In this series, the previous post was about Part 1: Data Warehousing Concepts. Please go through it if you did not read.

OLTP and Data Warehouse have many differences in the architecture, process and performance. Here are the differences on various aspects.
  • Performance
  • Data Modification
  • Design
  • Operation
  • Historical Data

Performance

Data Warehouse are developed to accommodate adhoc queries. So data warehouse should be optimized to perform well for any variety of possible query operations. Data Warehouse will perform better on queries. Because of the indexes define on the dimensional tables,  less number of joins and denormalized tables.
OLTP System is developed to support only predefined set of operations. So the database will be tuned only for those operations. For example, the transactions records are inserted, updated or deleted. If the index exists in the database, it will degrade the insert, update and delete operations.

Data Modification

A data warehouse is updated on a regular basis by the ETL process using bulk data load techniques. The end users of a data warehouse do not directly update the data warehouse.
In Data Warehouse, the data is loaded on bulk mode and the end user will not change any data.

Design

Data warehouses often use denormalized or partially denormalized schema (such as a star schema) to optimize query performance.
OLTP systems often use fully normalized schema to optimize update/insert/delete performance, and to guarantee data consistency. In OLTP systems, end users routinely issue individual data manipulation statements to the database. The OLTP database is always up to date, and reflects the current state of each business transaction.

Operation

Data Warehouse fetches millions of records at one shot. Whereas the OLTP fetches only handful of records at once.

Historical Data

Data warehouses usually store many months or years of data. This is to support historical analysis.
OLTP systems usually store data from only a few weeks or months. The OLTP system stores only historical data as needed to successfully meet the requirements of the current transaction.

In my next post, I will be explaining the different Data Warehouse Architectures.

If my post helped you understand the topic, please like and share and also share your comments with me to make the content better. Thanks for visiting my blog.

Part 1: Data Warehousing Concepts

Friday 9 January 2015

Part 1: Data Warehousing Concepts

What is a Data Warehouse ?

A data warehouse is a relational database that is designed for faster querying and analysis rather than for transaction processing. It usually contains historical data derived from transaction data, but it can include data from other sources. It separates analysis workload from transaction workload and enables an organization to consolidate data from several sources.

In addition to a relational database, a data warehouse environment includes an extraction, transportation, transformation, and loading (ETL) solution, an online analytical processing (OLAP) engine, client analysis tools, and other applications that manage the process of gathering data and delivering it to business users.

A common way of introducing data warehousing is to refer to the characteristics of a data warehouse as set forth by William Inmon:
  • Subject Oriented 
  • Integrated 
  • Nonvolatile 
  • Time Variant 

Subject Oriented

Data warehouses are designed to help you analyze data. For example, to learn more about your company's sales data, you can build a warehouse that concentrates on sales. Using this warehouse, you can answer questions like "Who was our best customer for this item last year?" This ability to define a data warehouse by subject matter, sales in this case, makes the data warehouse subject oriented.

Example: In an insurance company, there are many subject areas like premium collected from the customers, claimed given to the customers, etc. The data warehouse always concentrate on one more of subjects illustrated above.

Integrated

Integration is closely related to subject orientation. Data warehouses must put data from disparate sources into a consistent format. They must resolve such problems as naming conflicts and inconsistencies among units of measure. When they achieve this, they are said to be integrated.

Example: Consolidating the sales details of Super Market chain located in different cities to a homogeneous format.

Nonvolatile

Nonvolatile means that, once entered into the warehouse, data should not change. This is logical because the purpose of a warehouse is to enable you to analyze what has occurred.

Example: Once data is loaded to Data Warehouse for analysis, it will not change. The change happens only in the OLTP.

Time Variant

In order to discover trends in business, analysts need large amounts of data. This is very much in contrast to online transaction processing (OLTP) systems, where performance requirements demand that historical data be moved to an archive. A data warehouse's focus on change over time is what is meant by the term time variant. The data is analysed for specific data for specific period only. 
Example: The analysis of 2014 sales data on best performing products will not be useful in 2015 Sales unless it is used to forecast the sales.

The following example explains how the data is integrated from source systems to target systems.

Example of Source Data
Example of Target Data
In the above example, the customer application date is represented in different formats and with different attribute names across multiple source systems. But when it is integrated to the data warehouse, the data types, formats and attribute names are standardized. And analysts will be able to depend on single version of truth rather than analyzing multiple source systems.

OLTP to Data Warehouse Architecture Diagram


In the above diagram, sections 1,2 and 3 are OLTP Modules and 4, 5 and 6 are Data Warehouse and Business Intelligence Modules.

Business Modelling

This is the first step in the OLTP System development and it involves the following processes.
  • Identifying the Business Processes modules by visualizing and analyzing the business requirements. Example: Billing / Sales Module, Stock Management Module, Employee Module, etc in a Super Market.
  • Identifying the process flow between the Modules already identified. Example: how the process Sales Module is related with Stock Module.
  • Identifying the Data Flow between Modules. Example: In Sales and Stock module, quantity and price details are flown. 

Data Modelling

At this stage the data models of OLTP System and dimensional data models of Data Warehouse is developed. In most cases the data warehouse is built after the OLTP development is completed and Go-Live. This step involves identifying the physical tables for each module in OLTP and Data Warehouse. In OLTP, tables will be highly normalized. But in Data Warehousing the tables are normalized up to only 3NF.

Online Transaction Processing (OLTP)

In OLTP, transaction data of business day to day operations are stored in the database where more number of insert, update and delete operations are performed. Here the data is highly normalized and scattered in many tables. The data model for OLTP is designed in such a way to reduce storage space of the database and to minimize the update overhead. An OLTP system may store data in databases, files, XML data stores for data exchange and special systems like PeopleSoft, Siebel, SAP, etc.

ETL Process

The process starts only if the Data Warehouse dimensional modelling explained in the Data Modelling Step is completed. As I already told you, in most cases that I have seen Dimensional Modeling of Data Warehouse is performed just before the ETL process development. But there are end to end products like Oracle's Siebel Analytics, now it is called OBIEE where the OLTP, Data Warehouse and Business Intelligence or Reporting Modules are pre-built. The ETL process involves the below steps.
  • Creation of Sources and Targets. The identification of these objects is done in the Data Modelling Step.
  • Extract right data through proper Data Profiling and Cleansing Techniques.
  • Transforming the data in the desired format in order to meet the business's reporting requirements. Aggregation, Filtering, Joining, Sorting, etc are some of the transforming techniques available in the ETL Tools like Informatica, Ab-Initio, etc. There are ELT Tools as well available in the market. Oracle Data Integrator is an example for this.
  • The transformed data from the OLTP System is loaded in to the Data Warehouse Dimensional Tables by creating workflows and these Workflows can be executes based on the business requirement.
  • The Data Warehouse is built using the ETL process. Data Warehouse may have one or more Data Marts. Data Marts are subset of a Data Warehouse. There are 2 approaches of building Data Warehouse, one is Top-Down Approach and other Bottom-Up Approach. I will explain this in the upcoming posts.

Business Intelligence

The business reports are generated from the Data Warehouse which helps in Business Continuity Plans, Forecasting, Internal Reporting, etc.

In the next post, I will explain the difference between OLTP and Data Warehouse and Data Warehouse Architecture in detail. 
If my post helped you understand the topic, please like and share with your friends as well. Thanks for reading this article.

Saturday 16 August 2014

HRA Excemption Calculator

Hi Everyone,

Here is a simple tool developed to find out the House Rent Allowance (HRA) Exception for the financial year. This is applicable in India.

HOUSE RENT ALLOWANCE – SEC 10 (13A) READ WITH RULE 2A :
When the employee is occupying a rented residential accommodation, the amount of house rent allowance received by him is exempt to the extent of least of the following amounts:
a) 50% of the salary where residential house is situated at Mumbai, Calcutta, Chennai or Delhi and 40% of the salary where residential house is situated at any other place.
b) House Rent Allowance actually received by the Employee in respect of the period during which the residential accommodation is occupied by him during the year.
c) Amount of rent paid in excess of 10% of the salary. Besides the above, there are certain other incomes also, which are totally exempt or exempt subject to fulfillment of certain conditions.

Source: Income Tax Department

Download Tool Here

Thanks for using the software !

Friday 15 August 2014

Quick Rename: Quick File Name Changer for you !

Hi Everyone,

I have a simple and quick batch file name changer for your convenience and it is named as "Quick Renamer". It is minimally tested to ensure the quality and it is suitable for renaming your photos (It helps me a lot in labeling the photos), audio and video files. Since it is a Beta Software, it may contain lot of hidden bugs. So for safety please backup your files before performing any tasks.

Statutory Warning: Please take a backup of data before performing any tasks. This site or author wont be responsible for any sort of data loss caused by this tool. This is not for commercial use.

Download

Releases

Release 1.0
Initial version with file renaming, Append Label and Find and Replace option.

Uses of Quick Renamer

  • Helps to rename files in batch.
  • Helps find and replace the part of file name.
  • Helps append labels to the file name.

Prerequisite

Screenshot


Please post your comments and I will be happy to hear from you !


Sunday 25 May 2014

How to Download, Install and Configure Informatica Power Center 9.x ?

Hi All,


I am trying to explain you how to Download, Install and Configure Informatica Power Center 9.x. Please follow the steps one by one, to complete the entire process.

Note: This tutorial and the software is just for learning purpose. Any commercial use may require the respective license from the vendor.

Pre-requisites for the installation

Informatica Power Center Server Installer
Informatica Power Center Client Installer
Any Database installed (Oracle is used for this illustration)

How to download Informatica Power Center Server and Client Installers?

Step 1: Log-on to https://edelivery.oracle.com
Step 2: Select Product Pack and platform as shown below and click Go.

Step 3: Select the Media Pack and click "Continue".
Step 4: Find the download packages as shown below and download it.

How to unpack the download installers?

Unpack the installers as below.

Create Oracle user for Informatica Installation?

In this illustration, oracle is used as the repository database. Please find the screenshots below.

How to install the Informatica Power Center Server?

Find the Server Installer and install it.


Select "Install Informatica" option and click "Next".

Click on "Next".

Select the License Key file and Installation directory.

Click on "Install".


Select Create Domain option, if you are installing in the first node and leave rest of the settings as it is.

Select Database Type as Oracle, provide the Oracle User Name and Password. In the database address section give Machine Name and Port Name (1521 will be the default port for Oracle Database). Test Connection and Click on "Next" to continue.

Machine Name can be viewed in the system properties.

Furnish the Domain Name, Node Name, Domain User Name and Password of your choice and click on "Next".


Uncheck "Run Informatica under a different user account" and click on "Next".


Server Installation has been completed with this.

How to configure Informatica Power Center Server ?

Open the Informatica Power Center Administration Console from the Start Menu.


Log-on to the Informatica Power Center Administration Console

How to create Repository Service?

Select the New Repository as below.

Furnish the Repository Name, select License and Node and click Next.

Furnish the Oracle User Account details that we have created at the beginning. Select "Content exists", if you plan to create the repository contents later or "No content exists" option if you want to create the repository contents as we configure the Repository Service now.

Check "Create Global Repository" option to create a global repository.
Check "Enable version control" option to enable the version control in repository.

Note: Above settings can not be undone.


Click "Finish" to complete the Repository Configuration.

How to create Repository Content?

This step is required only if you have chosen the "Content Exists" option while you configure Repository Service. Otherwise skip this step.


How to change the Repository Operation Mode?

Click on "Edit".

Change Operating Mode to Normal.

Click on "Ok" and it will recycle the Repository service.


How to create new Integration Service?

Select New Integration Service as below.

Furnish the Integration Service Name, Select License and Node and click on "Next".

Furnish the Repository Name, Administration User, Password, Select Data Movement Mode as "ASCII" and click on "Finish" to complete.

Select, do not change any settings in this window and click on "Ok".

Enable the Integration service as below.

And we have successfully completed the Repository and Integration Service configuration.

How to create a User Group?

In the Security Tab, select Create Group. I am trying to create a developer group. So no administration privileges will be given. You can try creating groups with administrator privileges. 

Furnish the Group Name.

 In the overview window, you can see the users comes under the specified group.

The group privileges can be changed by clicking on the "Edit" button as shown below.


Assign privileges by selecting the respective check boxes and click on "Ok" to save and close.


How to Create User?

Select Create User option.

Furnish User details including password.

Edit option is used to change any details for the user including the password.

Groups tab is used to add the Group for the User.

Privilege Tab is used assign privileges for the user.


Roles Tab is used to assign roles for the user.

Note: The user will be having privilege of User or Group whichever is higher.

How to Manage Permissions?

Select "Permissions" as below.

The below window is used to assign domain permissions for the Users to Groups.

Grant and Revoke buttons serves its purpose.

And we can install Informatica Power Center Client.

How to install the Informatica Power Center Client?

Find the Client Installer and install it.


Select "Install Informatica"

Click on "Next".

Select all check boxes and click on "Next".

Select the directory for client installation.


Click on "Install".


Click on "Done".

The client installation is completed.

How to configure repository in the client tool?

Open any of the client tools from the start menu.


Click on "New" button.

Configure the repository in the client tool by furnishing the server details.

The details can be available from the Administration Console by clicking the Node as shown in the image below.


Select the repository and click on "Ok"

You have done with the configuration.

How to create Informatica  Folder?

Open Repository Manager from the Start Menu.

Logon to the Repository Manager

Create folder from the menu as shown below.

Furnish Folder Name.

Change the permissions in the Permissions Tab.


Now we have completed an End to End Informatica Power Center Installation and Configuration. You can start developing mappings and enjoy learning !

Thanks for reading my blog and do like and share if it really helped you.