This article explains the use of Java Transformation with an example.

We have input data as below.

And need to transform data in such a way that it creates 5 different records with EMI Sequence Number, due date and the outstanding or balance loan amount.

This transformation can be active or passive. When we think about transforming single record to multiple records, the first transformation comes to our mind is Normalizer Transformation. But for Normalizer transformation, a single record can be converted to fixed number of output records (Please refer my earlier post about Normalizer Transformation). In the example, different customers will have different tenure for loans. Lets see how this can be achieved with Java transformation.

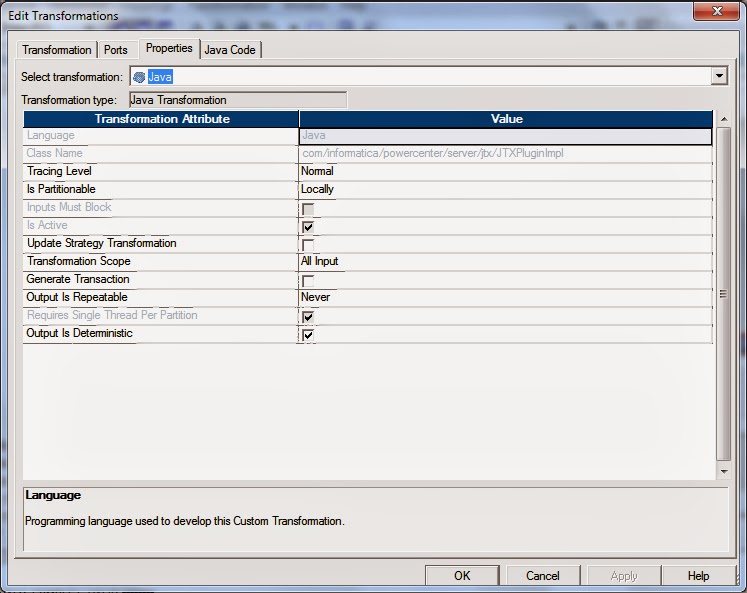
Java Transformation: The ouput ports for the java transformation is created manually and uncheck the Input Check Box.

Below are the settings for the transformation.

And here is the java code written to transform the data under "On Input Row" tab. Code written under this tab will take each record and transform it.

Expression Transformation: It converts the string to date.

Issues You might face are below:
Issue Snap:
 Resolution:
Enable High Precision in Java Transformation and in the session properties.

Thanks for reading my article !
We have input data as below.

This transformation can be active or passive. When we think about transforming single record to multiple records, the first transformation comes to our mind is Normalizer Transformation. But for Normalizer transformation, a single record can be converted to fixed number of output records (Please refer my earlier post about Normalizer Transformation). In the example, different customers will have different tenure for loans. Lets see how this can be achieved with Java transformation.

Java Transformation: The ouput ports for the java transformation is created manually and uncheck the Input Check Box.

Below are the settings for the transformation.
And here is the java code written to transform the data under "On Input Row" tab. Code written under this tab will take each record and transform it.

Java Code
try
{
DateFormat formatter = new SimpleDateFormat("dd/MM/yyyy");
Calendar cal = Calendar.getInstance();
int Yr, Mon;
String DtStr;
int loan_tenure;
BigDecimal loan_amount, emi_amount;
Date loan_st_dt = (Date)formatter.parse(LOAN_START_DT);
cal.clear();
cal.setTime(loan_st_dt);
cal.add(Calendar.MONTH, 1);
Yr = cal.get(Calendar.YEAR);
Mon = cal.get(Calendar.MONTH)+1;
DtStr = "01/" + Mon +"/" + Yr;
loan_st_dt = (Date)formatter.parse(DtStr);
loan_tenure = 1;
loan_amount = LOAN_AMT;
emi_amount = LOAN_AMT.divide(new BigDecimal(LOAN_TNR), 6, RoundingMode.HALF_UP);
do
{
loan_amount=loan_amount.subtract(emi_amount);
O_CUST_ID = CUST_ID;
O_CUST_NM = CUST_NM;
O_EMI_AMT = emi_amount;
O_EMI_NUM = loan_tenure;
O_EMI_DUE_DT = formatter.format(loan_st_dt);
O_OS_EMI_AMT = loan_amount;
generateRow();
loan_tenure = loan_tenure +1;
cal.clear();
cal.setTime(loan_st_dt);
cal.add(Calendar.MONTH, 1);
loan_st_dt = (Date)cal.getTime();
}while(loan_tenure <= LOAN_TNR);
}
catch (Exception e)
{
System.out.println(e+" This is a wind message. - "+e.getMessage());
}
{
DateFormat formatter = new SimpleDateFormat("dd/MM/yyyy");
Calendar cal = Calendar.getInstance();
int Yr, Mon;
String DtStr;
int loan_tenure;
BigDecimal loan_amount, emi_amount;
Date loan_st_dt = (Date)formatter.parse(LOAN_START_DT);
cal.clear();
cal.setTime(loan_st_dt);
cal.add(Calendar.MONTH, 1);
Yr = cal.get(Calendar.YEAR);
Mon = cal.get(Calendar.MONTH)+1;
DtStr = "01/" + Mon +"/" + Yr;
loan_st_dt = (Date)formatter.parse(DtStr);
loan_tenure = 1;
loan_amount = LOAN_AMT;
emi_amount = LOAN_AMT.divide(new BigDecimal(LOAN_TNR), 6, RoundingMode.HALF_UP);
do
{
loan_amount=loan_amount.subtract(emi_amount);
O_CUST_ID = CUST_ID;
O_CUST_NM = CUST_NM;
O_EMI_AMT = emi_amount;
O_EMI_NUM = loan_tenure;
O_EMI_DUE_DT = formatter.format(loan_st_dt);
O_OS_EMI_AMT = loan_amount;
generateRow();
loan_tenure = loan_tenure +1;
cal.clear();
cal.setTime(loan_st_dt);
cal.add(Calendar.MONTH, 1);
loan_st_dt = (Date)cal.getTime();
}while(loan_tenure <= LOAN_TNR);
}
catch (Exception e)
{
System.out.println(e+" This is a wind message. - "+e.getMessage());
}
Expression Transformation: It converts the string to date.

Issues You might face are below:
Issue Snap:

Enable High Precision in Java Transformation and in the session properties.

Thanks for reading my article !


